fiber bowls tutorial - section 4 of 4

Section 4 – Finish Edges and Stitch

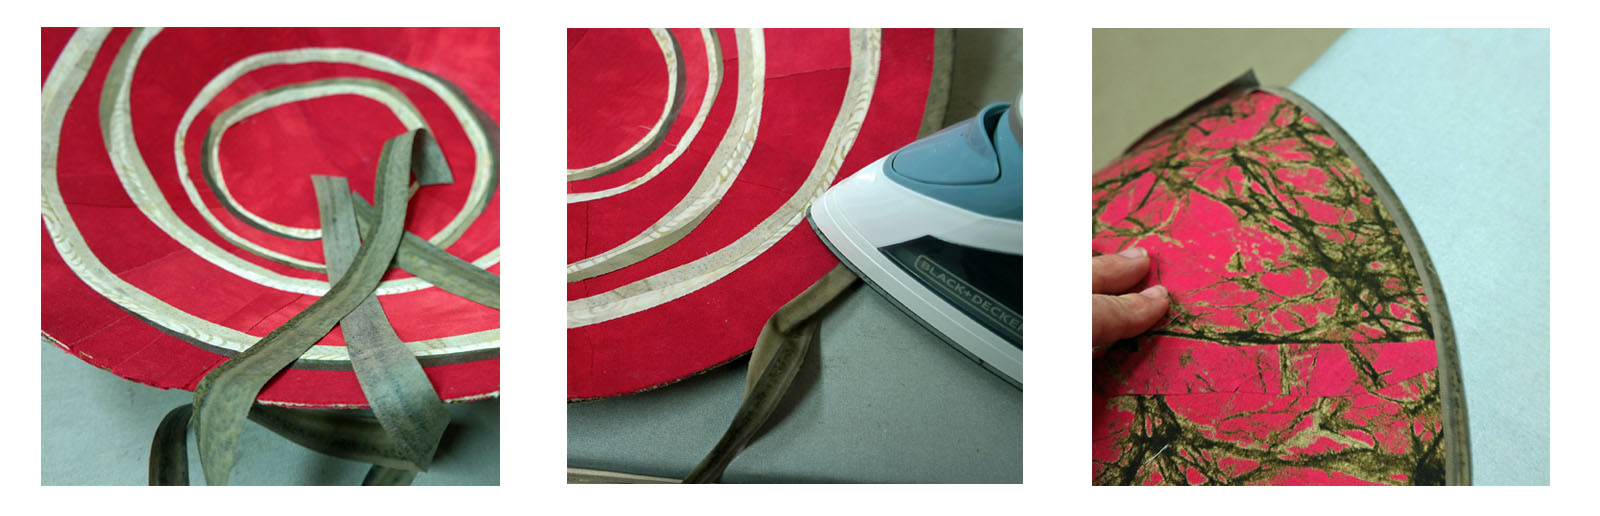
Now onto finishing the edge of the bowl: after applying fusible web to the fabric you’ll be using for this, cut a few on-the-bias strips about ¾” wide and altogether long enough to cover the entire circumference of your bowl. I didn’t cut them on the bias because I didn’t have enough fabric…it was just a bit trickier but it worked.

Fold the strips in half lengthwise to create a crease. While giving it a slight pull, carefully fuse it to the outer edge of your bowl using the crease as your guide for where to fold to the back of your bowl.

Fold strip to the back of the bowl and fuse. Do this until the entire edge is covered.

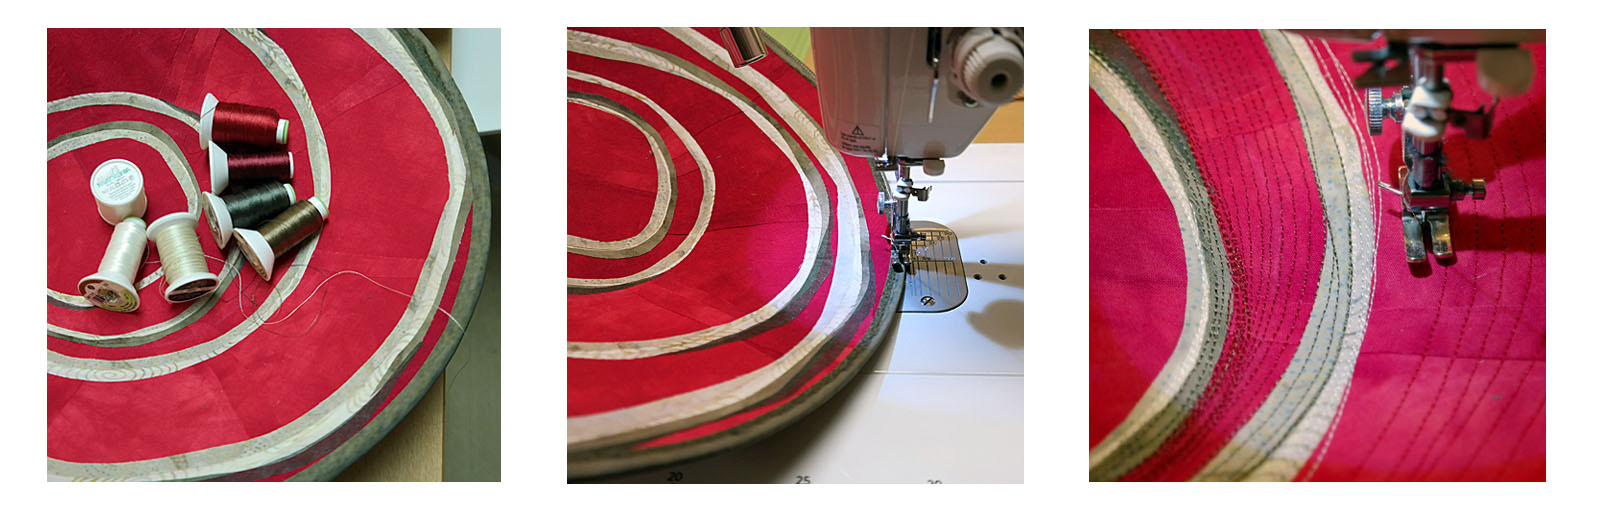
Your bowl is now ready for stitching. Select coordinating (or not) threads and setup your machine. I tend to use polyester (but pretty much anything works, just experiment and discover what your machine handles best) on the top and bottom (bobbin.) Sometimes I use invisible thread (Madera) in the bobbin to get a uniform look in the back and avoid any bobbin thread showing on the inside of my bowl.

Starting either at the outer edge or center of your bowl, sew round and round and spiral your way in and out of the bowl several times.

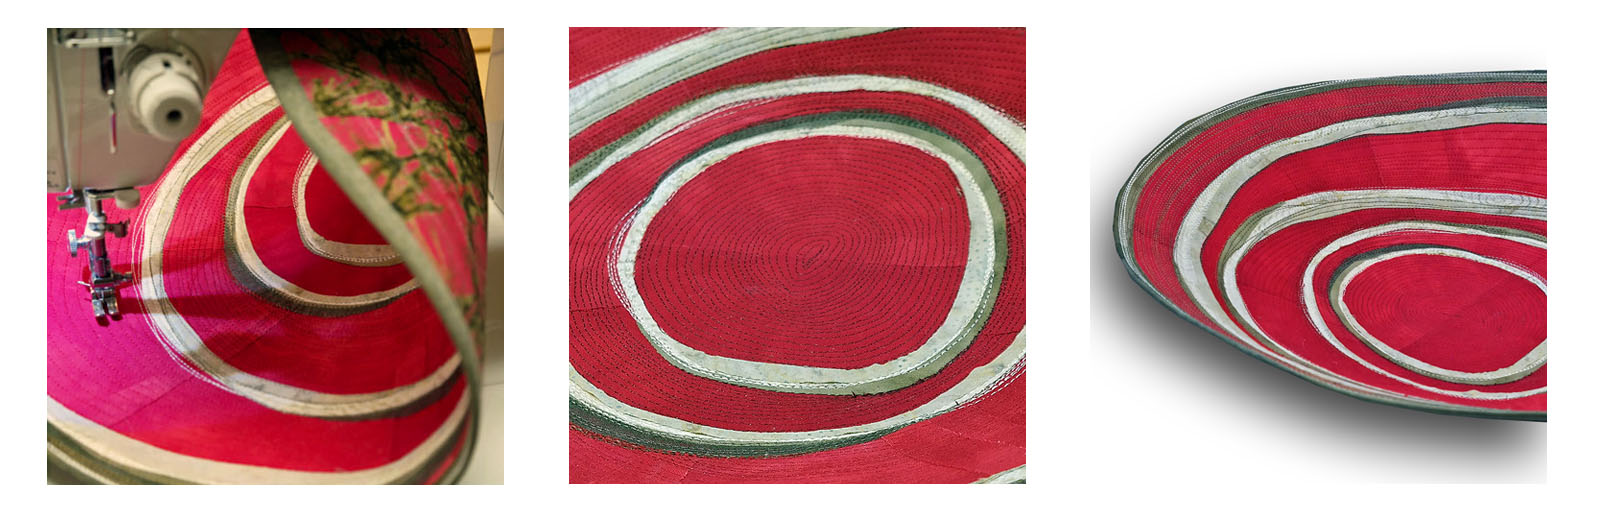
The more stitching, the stiffer a bowl you get. This works best with a glass of wine in your other hand!

Remember that your bowl is flexible, you may need to fold it depending on the throat size of your machine.

The center of your bowl is the trickiest to reach, do this very slowly (and fold your bowl if needed.)

Finished!

I’ve shown you the easiest way to stitch your bowl and I highly recommend you start there, but after you feel comfortable with the way your machine handles all those layers, I encourage you to try other stitching…free motion can be fun on a bowl!

You are now ready to play and experiment on your own! Have fun and if you’d like to take this a step further, come to one of my Bowl classes where we work on more complex designs, explore different shapes and finishes, and even cut holes through our bowls! Classes are posted on my calendar or you can contact me.


Comments

Ellen (Aug 22, 2021)

Thank you very much for the work and time you have put into this great tutorial - very generous of you. I live in New Zealand.

Rosalyn Brainard (May 22, 2021)

Hello I just found your blog and am excited to try these fiber bowls as I was on a Zoom Webinar and there was a fiber bowl in the background of one person who said she had taken a class however I didn’t pick up a name. One question I have is: I have an embroidery machine and was wondering if I could embroidery in the bowl? If not I guess I could do it as a patch and iron it in! Wish I could be at Sisters Oregon this summer however I will be there in July and miss your class, really glad I found your blog!

Maria Eugênia (Feb 19, 2021)

Thank you for the teachings !! I loved every detail. Too bad I can’t do a face-to-face class with you! I live in Brazil!

Marcy McIntyre 😏 (September 23, 2020) (Sep 24, 2020)

Inspiring and thank you for sharing your techniques and wonderful fiber art! Have you tried different sizes and shapes other than the 16-18" circles? I hope to take a class from you when they are available again.

Karen Newberry (Jun 14, 2020)

I’m wondering what your thoughts are regarding using regular Wonder Under, the stretch variety, or the heavy duty? Do you feel there is an advantage of one over another? I could see how the stretch variety may make adding pieces once the curves have been sewn in, and the heavy duty may make fusing to canvas easier, though perhaps make it more difficult to sew through later? Curious what your thoughts are. Thanks!

I took your class in Sister’s Oregon several years ago. Thank you for the refresher! I love the process and this will give me the courage to make another one! (Oct 14, 2019)

Thank you!

Heidi (Sep 30, 2019)

This is out of this world. Thank you so much for sharing. Wish I lived in the States to take some of your classes. Maybe somebody will try here in South Africa. But with Christmas not that far away I will try and make a few presents and hope they will come out like yours. (wishful thinking maybe, but I have a go). It will be something very special for a good friend of mine who is also a quilter. Wishing you all the best and hope you will have many more of your brilliant ideas. Thanks again Heidi

Lyla Messinger (Sep 7, 2019)

I love your work! Do you have a class schedule for 2020 yet?

Marion Stonehouse (May 15, 2019)

I found your work through Pinterest; it is fabulous, how I wish I lived in the States! However I am in France. I am a feltmaker using wools and other fibres to create landscapes. Your work inspires me and your generosity in sharing your techniques and talents with other textile lovers is greatly admired and appreciated. Thank you so much.

Hilde Morin (Apr 17, 2019)

Jayne, the stitching around your bowl is totally up to you! If your design is such that you are not to cross lines, don’t cross them. In this case, I cross the lines all the time.

Jayne Slovick (Apr 14, 2019)

I just ran across this tutorial. It is so nice that you are sharing your info. I have one question. When we are stitching the bowland spiraling in and out of the bowl, are we supposed to be careful to not cross over the line We have already stitched ?

Shari Belling (May 9, 2018)

Love, love, LOVE your class this week in Kalispell, MT. These bowls are fabulous and even more awesome in person and you share your knowledge and expertise with such grace. Thanks for giving us this post-class reference material here on your blog. To those contemplating taking one of Hilde’s classes …don’t hesitate as you will not regret it!!

Marty (May 3, 2018)

Looking forward to your class in kalispell next week This looks as if it will be fun and creative Rosalie told me how much she enjoys knowing you See you very soon.

Gordeen Darbee Sherwood (Apr 10, 2018)

Thank you so much! WOW!

Pam Hansen (Apr 9, 2018)

Your work is so inspiring to me, and several years after the curves class, when I am admiring my hand dyed fabrics, your words are still ringing in my ears to ‘cut up my hand dyes’! Thank you for telling it to me straight and generously sharing your skills and warm personality. Your graciousness has created beauty in my world and my heart.

Celia Ciuffo (Apr 8, 2018)

Como siempre, muy claras las explicaciones! Gracias Hilde!…..te extrañamos en Córdoba!!!

Antje Kiewied (Apr 8, 2018)

Vanuit Nederland, prachtige instructie lessen. Ga het zeker proberen. Bedankt.

kristin skantze (Apr 8, 2018)

Your tutorial is very helpful! What a stunning bowl… you are so inspiring! I will continue to enjoy following your work! Thank you! Kristin, Pine Ridge, SD

Leslie Dickinson (Apr 8, 2018)

Wow Hilde, this is such a nicer refresher for me. I have been making a lot of bowls and at times I get lost in how to cover up my zig zag seams. This was really helpful. How wonderful of you to share all this info online. I truly appreciate your ability to make it look so easy. I love making these bowls!

Nancy Woodling (Apr 8, 2018)

Thank you so much for doing this tutorial. Not only is it a blessing to know how you accomplish your beautiful work, but to open your heart and soul into sharing your talent with others is paying it forward to all of us. It now lies with each of us to continue sharing our talents, as well. Your generosity will live on in many other areas. Thank you again. Nancy
Leave a comment